Tuts Listed At

Tuesday, February 1, 2011
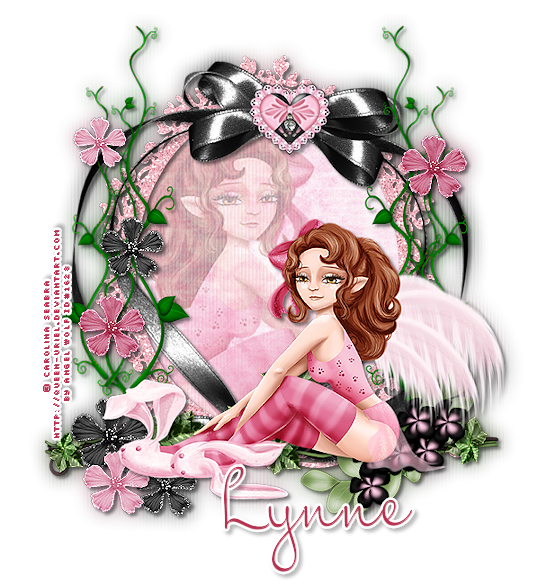
This tutorial is for those that have a working knowledge of PSP and was created using PSP version 9 however it may be created in other versions as well.
Tube used in this example is from the wonderful artist ©Carolina Seabra which you must retain a license in order to use that can now be purchased HERE
Tube used in this example is from the wonderful artist ©Carolina Seabra which you must retain a license in order to use that can now be purchased HERE
.
Materials Used
Scrap Kit by Lynne-Baby Cakes Scraps "Tickle Me Pink" Which is a paid kit. You obtain this kit from her store at Sunflower Scraps
Materials Used
Scrap Kit by Lynne-Baby Cakes Scraps "Tickle Me Pink" Which is a paid kit. You obtain this kit from her store at Sunflower Scraps
Adjust Variations Filter
Font Used: MrsBlackfort
*************************************
Lets Get Started:
Use my Tag for reference when placing your elements
1. Open a new image 600x600 transparent background.
2. Open BCS Oval Frame. Re size 60% Copy and paste as a new layer onto your new tag image.
3. Grab your magic want and select the center of your the oval frame. Selections, modify, expand 5 pixels. Hi light the bottom layer. Open BCS Paper Nine. Re size 50%. Copy and paste as a new layer onto your new tag image. Selections, invert and press your delete key. Keep Selected.
4. Open your tube of choice. If your going to use the same tube I did then you will want to erase the copyright text, mirror and then copy and paste as a new layer. Re size 120% and arrange to liking. Press your delete key to remove any parts of the tube outside of the frame. De select.
5. Effects, texture effects, blinds with these settings: W=4, O=4, Color= #E27899, Horizontal Light=Unchecked, Apply and lower the opacity to this layer to 35%.
6. Hi light the very top layer. Open BCS ribbon frame 2, re size 85%. Copy and paste as a new layer onto your tag image and arrange as in my tag.
7. Open BCS heart. Re size 15% then re size again 80%. Sharpen and copy and paste as a new layer onto your tag image and place it in the center of the bow of the heart frame.
8. Open BCS vine. Effects, plugins, Adjust, Variations and colorize with these settings: More Green x7, Darker x9, More Cyan x1 apply. Copy and paste as a new layer onto your tag image. Re size 75% and arrange to the right of your frame as in my tag. Duplicate image mirror. Duplicate and re size 80% and arrange again as in my tag. Duplicate, image mirror.
9. Open BCS Ivy Copy and paste as a new layer. Rotate 90° to the left re size 40% Image, sharpen. Place this near the bottom of the frames.
10. Open BCS glitter flower 2. Copy and paste as a new layer onto your tag image and re size 30%. Place over your ivy on the left side. Duplicate again re size 80% and place it a little lower and to the right of the first one. Duplicate this flower once again and place it on the left over the vine again as in my tag.
11. Open BCS glitter flower. Copy and paste as a new layer onto your tag image. Re size 25%. Place down between the first 2 black glitter flowers. Duplicate this flower 3 more times. Re size the first of the 3 by 70% and place to the top left of your vine as in my tag. With your next duplicated flower Place it to the lower left of the black glitter flower that is sitting on the vine. Then place the final duplicated flower to the right side of your tag again as in my tag.
12. Effects, Adjust, Variations and click on darker a few times to make it a darker pink and apply. High light your pink glitter flower that is to the lower left of your black flower on the vine and colorize it in the same way.
13. Open BCS cluster and copy and paste it as a new layer onto your new tag image. Image, rotate to the left by 40° and place in the lower right of the frames as in my tag.
14. Open your main tube again and copy and paste it onto your tag image and place it to your liking and re sizing it as needed.
15. Add your favorite drop shadow to all your element layers and your tube. Merge your layers visible.
16. Duplicate your entire tag image. High light your bottom original and go to adjust, blur, gausian blur radius =10. Effects, Texture effects, blinds : W=4, O=100, Color=white and apply.
17. Add your copyright and your name and export as your favorite image format.
I hope you have enjoyed doing this tutorial. I would love to see your end results if you would like to share them with me.
Hugs
Angel Wolf
Subscribe to:
Post Comments
(Atom)
I Create For:


Blogroll
-
Easter Elegance- CT for Starlite and Soul - •♦• •♦• •♦• •♦• •♦• •♦• •♦• • ****CT for Starlite and Soul**** Kit Name: Easter Elegance Artist: AI Generated tube by Starlite and Soul Where to st...
 1 month ago
 -
NEW MOTHERS DAY COLLAB - CHILDHOOD BLESSINGS - WE HAVE COME TOGETHER AGAIN TO BRING YOU THIS LOVELY MOTHERS DAY THEMED COLLAB- YOU WILL $AVE BUY PURCHASING THE COMPLETE COLLAB - HERE OR YOU CAN PUR...
 3 years ago
 -
6th Annual Halloween Candies Freebie BlogTrain 2018 - You can get all the beautiful parts of this train here: https://madmimi.com/p/efd22d You can get my part here! https://www.dropbox.com/s/ndrao7pwthm...
 5 years ago
 -
-
New Freebie Kit - For The Love Of Autumn - *Hi All New kit For you!! For The Love Of Autumn.. I hope you like it tons of gorgeous elements vibrant Autumn colors, cute fall critters and all things f...7 years ago
-
CU BEAR IN THE CUP SCRIPT AND TEMPLATE - *AVAILABLE IN THE STORES* [image: post signature]
 8 years ago

0 comments:
Post a Comment