Tuts Listed At

Wednesday, December 22, 2010
 Tube used in this example ©Rachael Tallamy Which you must retain a license in order to use which may be purchased Here Materials Used Scrap Kit by Baby Cakes called "Whimsy" Which can be Obtained from Here Other Materials and Filters Used: ********************************** Lets Begin Open WSL Mask260 and minimize for now. 1. Open a new image 600x650 2. Open BCS_Aged_Frame, resize 75%, sharpen. Plugins-Adjust-Variations and click on more cyan once and apply. 3. Using your magic wand, click in the center of the frame to select it. Selections-modify-expand by 5. 4. Open BCS_Paper_Fourteen or one of your choice. Resize 70%. Copy and paste as a new layer onto your tag image. Selections- invert and press your delete key. Layers-arrange-move down. 5. High light the frame layer. Open BCS_Ivy, resize 40%. Copy and paste as a new layer onto your tag image. Rotate-free 45% to the right. Place it on the right top corner of the frame as in my tag. Apply your favorite drop shadow. Duplicate this layer. Image-mirror, layers-merge down. 6. High light the very top (ivy layer) Open BCS_Bead_Swirl_Two. Resize 70%-sharpen. Copy and paste as a new layer onto your tag image. Move down below your frame layer in the upper right of your frame. See my tag for reference. Apply your favorite drop shadow. Duplicate-image-mirror-flip. Layers-merge down. 7. High light the top layer again. Open BCS_Rose_Cluster. Resize 30%-sharpen. Copy and paste as a new layer onto your tag and place on the lower right side of your frame. Apply your favorite drop shadow. Duplicate-image-mirror. Layers-merge down. 8. High light the top layer. Open BCS_Curly_Ribbon_Two. Resize 25%-sharpen. Arrange over the rose clusters near the bottom. Apply your favorite drop shadow. Duplicate-image-mirror. Layers-merge down. 9. High light the top layer and open BCS_Daisy. Resize 20%-sharpen. Copy and paste as a new layer onto your tag image and place in the center of the rose clusters. Apply your favorite drop shadow. Duplicate the daisy and resize 90% and place to the lower right of the center daisy-duplicate image mirror. Layers-merge down twice. 10. High light the Ivy layer and open the BCS_Daisy again. Resize 20%. Copy and paste as a new layer onto your tag image and place near the bottom of one of the ivy vines. Apply your favorite drop shadow. Duplicate-image-mirror. Layers-merge down. 11. High light the top layer and open BCS_Tied_String_Two. Resize 40%-sharpen. Copy and paste as a new layer onto your tag image and place over the ivy and daisy on the right side of the frame. See my tag for reference. Apply your favorite drop shadow. 12. High light the top layer an open BCS_Brad (the green one). Resize 20%-sharpen. Copy and paste as a new layer onto your tag image and place in one of the corners of the frame. Apply your favorite drop shadow. Duplicate-image-mirror. Layers-merge down. 13. High light the top layer and open BCS_Blossom. Resize 30%-sharpen. Copy and paste as a new layer onto your tag image and place in the top center of the ivy on your tag but slightly placing it to the left. Apply your favorite drop shadow. Duplicate, layers merge down. 14. High light the top layer and open BCS_Butterfly_Nine (or one of choice). Resize 20%. Copy and paste as a new layer onto your tag image and place between the 2 blossoms in the top center. Apply your favorite drop shadow. 15. High light your paper background layer below the frame. Open the tube of choice and resize as needed. Copy and paste as a new layer onto your tag image and arrange to your liking. Apply your favorite drop shadow. 16. High light the very bottom layer. Open BCS_Paper_Fifteen or one of choice and resize 80%. Copy and paste as a new layer onto your tag image. Layers-new mask layer-from image. Choose the WSL Mask260, Source Luminance checked and Invert Mask Data Unchecked. Apply. Layers-merge group. 17. Merge all layers visible. Apply your copyright and your name then export as your favorite image format. *************************** This is the original Tag I created Before deciding to write this tutorial 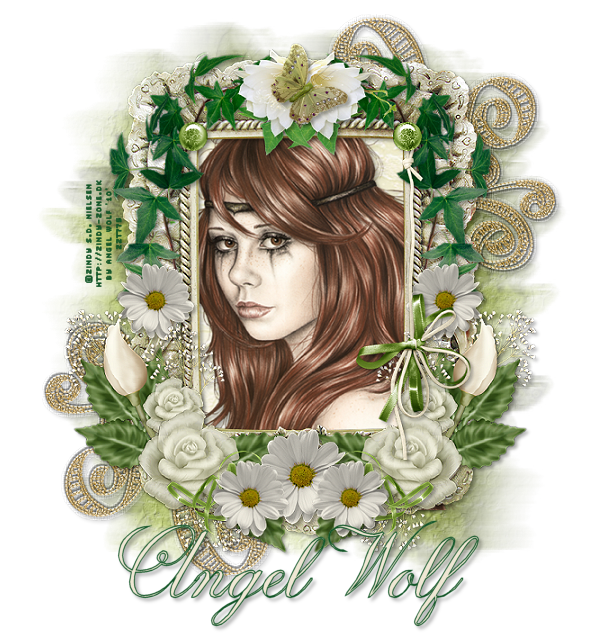 |
Subscribe to:
Post Comments
(Atom)
I Create For:


Blogroll
-
Easter Elegance- CT for Starlite and Soul - •♦• •♦• •♦• •♦• •♦• •♦• •♦• • ****CT for Starlite and Soul**** Kit Name: Easter Elegance Artist: AI Generated tube by Starlite and Soul Where to st...
 1 year ago
 -
NEW MOTHERS DAY COLLAB - CHILDHOOD BLESSINGS - WE HAVE COME TOGETHER AGAIN TO BRING YOU THIS LOVELY MOTHERS DAY THEMED COLLAB- YOU WILL $AVE BUY PURCHASING THE COMPLETE COLLAB - HERE OR YOU CAN PUR...
 5 years ago
 -
Friday. New Kits loaded to PFD - New Kits at PFD. You can check them out here.. HappyPsp_ing!
 8 years ago
 -
New Freebie Kit - Back to School Time! - *Hi all so excited to have a new kit for you. I love school themes and I'm naming this one Back to School Time! Hope you all like it. It's a very cute k...9 years ago
-
CU BEAR IN THE CUP SCRIPT AND TEMPLATE - *AVAILABLE IN THE STORES* [image: post signature]
 9 years ago
 -
Lilac Garden - 2 PTU Tag CT With the beautiful scrap kit " Lilac Garden" by Tiny Turtle Design Gorgeous kit, contains lots of elements and beautiful paper. This kit is ...
 10 years ago
0 comments:
Post a Comment