Tuts Listed At
Thursday, December 23, 2010

This tutorial is for those that have a working knowledge of PSP and was created using PSP version 9 however it may be created in other versions as well.
Tube used in this example is from the wonderful artist ©Jessica Dougherty which you must retain a license in order to use that can be purchased Here (Cilm Will be closing Dec. 31, 2010).
Tube used in this example is from the wonderful artist ©Jessica Dougherty which you must retain a license in order to use that can be purchased Here (Cilm Will be closing Dec. 31, 2010).
.
Materials Used
Scrap Kit by JT's Designs called "In the Moment" Which is a paid kit. You obtain this kit at Sunflower Scraps Boutique Here
Variations Plugin Filter Here
(look down where it says Effects: Adjust Variations)
WSL_Mask236 HERE
Materials Used
Scrap Kit by JT's Designs called "In the Moment" Which is a paid kit. You obtain this kit at Sunflower Scraps Boutique Here
Variations Plugin Filter Here
(look down where it says Effects: Adjust Variations)
WSL_Mask236 HERE
Font Used = P22 Corinthia
**************************************************
Lets Get Started
Open WSLMask_236 and minimize for later use
1. Open JTD_ITM_Frame1. Duplicate then close the original. Image, resize 70% all layers unchecked. Adjust-Sharpness-sharpen.
2. Using your magic wand select the center of your frame. Selections, modify, expand and expand it by 5 pixels. Open JTD_ITM_Paper13. Copy and paste as a new layer onto your tag image. Selections Invert (CTL+Shift+I). Press your delete key. Layers-arrange-send to bottom then deselect.
3. High light your top layer. Open JTD_ITM_Doillie1. Copy and paste as a new layer onto your tag image and move it to the upper right , see example below. Layers-arrange-send to bottom. Duplicate, Image mirror. Layers-merge down. Duplicate, Image-Flip. Layers Merge down.

4. High light the top layer. Open JTD_ITM_Doillie2. Copy and paste as a new layer onto your tag and arrange to the top center of your tag. See my example. Layers-arrange-send to bottom. Duplicate layer, Image flip. Layers-merge down.

5. Repeat the above step except this time place the doilie to the center left. Layers-arrange-send to bottom. Duplicate the layer. Image-mirror. Layers-merge down.
6. High light Raster 3 layer and layers merge down 2 times. This is merging all your lace layers together.
7. High light the top layer. Open JTD_ITM_FlowerDoodle1. Copy and paste as a new layer onto your tag image. Image-rotate free to the right 30% then image sharpness-sharpen. Arrange this on the lower right of your frame. Layers duplicate then image mirror. Layers merge down.
8. Open JTD_ITM_DaffodilBouquet1. Copy and paste as a new layer onto your tag image. Arrange over the top of the flower doodle that you just placed. Duplicate and then image mirror.
9. High light your frame layer. Open JTD_ITM_CornerBloom2. Copy and paste as a new layer onto your tag image. Image-rotate free to the left by 120%. Resize 90%, Adjust-sharpness-sharpen. Arrange in the lower center of your frame.
10. High light the top layer. Open JTD_ITM_Bow1. Copy and paste as a new layer onto your tag image and then resize 60%. Arrange on the top center of your frame.
11. Apply your favorite drop shadow to all of your layers excluding your paper layer. After you have applied a drop shadow to the lace layers go to Adjust-sharpness-sharpen.
12. High light the top layer. Open the tube of choice and resize as needed. Arrange the tube as desired and once you are happy with it duplicate then move the original tube down below the frame layer.
13. Highlight the top layer (should be your duplicated tube) with your free hand tool set at point to point select around the tube where it would protrude outside of the frame. You want your tube to appear as if the lower portion is under the flowers but the top portion over top of the frame.
14. If there is any portion of your bottom tube protruding out side of the frame you will want to high light this layer and select in the same manner and delete.
15. Open JTD_ITM_Paper2 (or one of choice). Copy and paste as a new layer onto your tag image. Layers-arrange -send to bottom. Layers-new mask layer-from image- choose WSL_Mask236, source luminance checked, invert mask data not checked and apply. Layers-merge-merge group. Resize by 90%.
16. You may merge all layers visible at this time and add your © and your name and export as your favorite image format

This tutorial is for those that have a working knowledge of PSP and was created using PSP version 9 however it may be created in other versions as well.
Tube used in this example is from artist ©Barbara Jensen which you must retain a license in order to use that can be purchased HERE.
Materials Used
Scrap Kit by Tina's Magical World called "Miss Independent" Which is a paid kit and can be purchased from one of the stores listed on her blog HERE
Tina's Magical World's Template #10-Version HERE
Make sure you do NOT download the single version of 10
it has to be the "version" choice
Butterfly Tube HERE
***************************************
Let's Get Started
1. Open TMW template10_version. Duplicate and close the original. Now delete the following layers: credits, framed heart, word art and cards.
2. Highlight the mask layer. Selections-select all-float-defloat. Open TMW_independent_paper26, copy and paste as a new layer onto your tag/template image. Selections-invert, press your delete key and deselect. Layers-merge-merge down. Apply your favorite drop shadow.
3. Highlight the heart circle small layer. Selections-select all-float-defloat. Selections-modify-expand 1 pixel. Open TMW_independant_paper21. Copy and paste as a new layer onto your tag/template image. Selections-invert, press your delete key and deselect. Layers-merge-merge down. Apply your favorite drop shadow.
4. Highlight heart circle layer and repeat the above steps.
5. Highlight big circle layer. Selections-select all-float-defloat. Selections-modify-expand 1 pixel. Flood fill with color #AA3350. Selections-modify-contract, 5 Pixels. Open TMW_independent_paper23. Resize 80%. Copy and paste as new layer onto your tag/template image. Selections-invert and press your delete key. Deselect, Layers-merge-merge down and apply your favorite drop shadow.
6. Highlight the dark grey circle. Selections-select all-float-defloat. Selections-modify-expand 1 pixel, flood fill with color #AA3350. Selections-modify-contract 5 pixels. Open TMW_independent_paper17, resize 80%. Copy and paste as new layer onto your tag/template image. Selections-invert press your delete key. Deselect. Layers-merge-merge down. Apply your favorite drop shadow.
7. Highlight the bracket right layer. Selections-select all-float-defloat. Selections-modify-expand 3 pixel. Open TMW_independent_paper18. Resize 80%. Copy and paste as a new layer onto your tag/template image. Selections-invert press your delete key. Selections-invert, Selections-modify-contract 3 pixels. KEEP SELECTED.
8. Open TMW_independent_paper14, resize 50%. Choose one of the following methods of colorizing:
Variations: Choose More red then darker 2 times
Adjust-color balance-Red/Green/Blue: R= -10, G= -25, B= -45.
Variations: Choose More red then darker 2 times
Adjust-color balance-Red/Green/Blue: R= -10, G= -25, B= -45.
Copy and paste as a new layer onto your tag/template image and with your mover tool move over your bracket to your liking. Selections-invert press your delete key. Deselect. Layers-merge-merge down 2 times. Apply your favorite drop shadow . Move this bracket over to the right as in my tag.
9. Highlight your left bracket layer and repeat the above step Except you will not need to colorize the paper again.
10. Highlight the grey heart layer. Selections-select all-float-defloat. Selections-select all-modify-expand 1 pixel. Flood fill with color #AA3350. Selections-modify-contract 5 pixels. Open TMW_independent_paper5. Resize 50%. Copy and paste as a new layer onto your tag/template image. Selections-invert press your delete key. Deselect. Layers-merge-merge down. Apply your favorite drop shadow. Move this layer to the very top.
11. Open TMW_independent_ladieshat5. Resize 35%-sharpen. Copy and paste as a new layer onto your tag/template image rotate 45% to the right. Adjust-Hue/Saturation- Colorize-Hue= 245, Saturation= 150.Move the hat so that it is over the left bubble of the heart. Apply your favorite drop shadow.
12. Highlight the very top layer then open the TMW_independent_bow1, resize 40%-sharpen and colorize in the same manner that you did for the above step. Copy and paste as a new layer onto your tag/template image. Move the bow to the center of the right bracket layer and apply your favorite drop shadow. Duplicate this bow. Image-mirror and move down to the center of the left bracket making sure that it is on top of the bracket. Layers-merge-merge down.
13. Highlight your Raster1 Layer (should be the hat layer), Open your tube of choice and resize as needed (mine did not need to be resized). Arrange your tube under the left bracket to your liking. Apply your favorite drop shadow.
14. Highlight bracket left down layer then open TMW_independent_Flower4. Resize 50%, sharpen. Copy and paste as a new layer onto your tag/template image and move it down to the lower left of your left bracket (see my tag for placement) apply your favorite drop shadow. Duplicate this flower and arrange it a little to the right but around the center of the bottom of your tag image. Duplicate this flower layer and move it again to the right but not over the right bracket. See my tag for placement.
15. Open TMW_independent_Flower1, resize 40%-sharpen. Copy and paste as a new layer onto your tag/template image and arrange it over top of the left 2 flowers. Apply your favorite drop shadow. Duplicate this flower and move it over the right bracket but under the flower. Again see my tag for placement or place to suit you.
16. Highlight the very top layer. Open TMW_independent_littlebag6- resize 40%, sharpen. Copy and paste as a new layer onto your tag/template image and place it as in my tag. Apply your favorite drop shadow.
17. Open TMW_independent_lipstick4 or one of choice.
**Optional**
If you want to colorize the lipstick color, use your freehand selection tool and select around the lipstick and colorize to match your tubes lip color or to one of your liking. Once happy with the color of your lipstick color, Deselect then resize 40%, sharpen. Copy and paste as a new layer onto your tag/template image and place in front of your little bag. Apply your favorite drop shadow.
18. Open the bf65 tube I supplied and using your point to point selection tool, select around the top butterfly. Copy and paste as a new layer onto your tag/template image. Arrange in the empty right area of your tag. Resize 125% or as needed to fit in the area. Adjust-sharpen.
19. Hide the bottom white layer then make sure one of your other layers are highlighted then go to layers-merge-merge visible. Resize 80%. Duplicate the tag layer then highlight the original tag layer and Adjust Blur-gaussian blur-radius= 15. Effects-Texture Effects-Blinds=: Width- 4, Opacity= 100, Color= #DD7B92 (or of choice), Horizontal checked. Highlight your top tag layer and resize 95%. All layers unchecked.
20. Highlight your bottom white layer then open the TMW_independent_doodle4. Resize 95%, sharpen. Copy and paste as a new layer onto your tag/template image and arrange in the top right of your tag/template image (as in my tag). Apply your favorite drop shadow. Duplicate this doodle, Image-mirror-image-flip and arrange to liking.
21. Highlight your bottom white layer and hide it then highlight any other layer. Layers-merge-merge visible, Unhide your bottom layer and highlight your top layer. Add a new raster layer then add your copyright and your name. Export as your favorite image format.
I hope that you enjoyed doing my tutorial and if you have any problems please email me and I will help you where you need it
Thank You
Angel Wolf
***************************************
Awesome Result!! Thanks so much Paula.
I totally love your outcome and thank you
for testing my tutorial.
Huggles
Angel Wolf
I totally love your outcome and thank you
for testing my tutorial.
Huggles
Angel Wolf


This tutorial is for those that have a working knowledge of PSP and was created using PSP version 9 however it may be created in other versions as well.
Tube used in this example is from artist ©Ismael Rac which you must retain a license in order to use that can be purchased Here.
Materials Used
Scrap Kit by Essy called "Some Like It Hot" Which is a paid kit and can be obtained from Here
Mask Here
(I do not know the owner of the mask. If this is yours please let me know so I can give proper credit or remove it.)
(I do not know the owner of the mask. If this is yours please let me know so I can give proper credit or remove it.)
No Outside filters were used in this tutorial.
***********************************
Lets Get Started
1. Open the mask that I have provided and minimize it for now.
2. Open a new image 650x500 and then flood fill it white.
3. Open slihpp1_es then on your color palette change the foreground to pattern and choose the paper pattern you just opened Scale at 50.
4. On your tag image add a new layer and flood fill with your patterned paper. Layers-new mask layer-from image-choose the tde_06, Source Luminance, Invert mask data ticked. Accept then Layers-merge group.
5. Open slihframe2_es, resize 55%. Copy and paste as a new layer on your tag image. Now take your deform tool and deform it to fit the rectangular area of the mask. See my tag for reference.
6. Grab your magic wand and select inside of the frame- Selections-modify-expand 5. Open slihpp2_es, resize 50%, copy and paste as a new layer on your tag image. Selections invert and hit your delete key. Select None and move this paper layer under the frame layer.
7. Highlight the very top layer then open slihflwrbranch1_es, resize 55% copy and paste as a new layer and move to the right side of the frame. Apply your favorite drop shadow. Duplicate this layer, Image mirror.
8. Open slihbf3_es, resize 15%, copy and paste as a new layer on your tag image and place over the butterfly on the mask on the right side, Apply your favorite drop shadow. Duplicate the butterfly, Image-flip, and move over the butterfly on the left of the tag. Duplicate one last time, Image-rotate-free-120 to the left and move this over the butterfly on the bottom left.
9. Open slihflwr4_es- resize 30%, copy and paste as a new layer on your tag image and place it at the bottom center of the frame. Apply your favorite drop shadow. Duplicate this flower and resize 50% and move it to the left corner of your frame-Adjust-sharpen. Duplicate this flower again-Image-Mirror.
10. Open slihflwr2_es, resize 20%, copy and paste as a new layer on your tag image and move it between the large and small flower on either side. Layers-arrange-move down and apply your favorite drop shadow. Duplicate the flower, Image-Mirror. Arrange all your flowers to your liking.
11. Open the heart of choice with a saying, resize 15%, copy and paste as a new layer on your tag image and place it in the center of your large flower. Apply your favorite drop shadow.
12. Open the tube of choice resize if needed and then copy and paste as a new layer. Move your tube down below all of your bottom flower layers and apply your favorite drop shadow.
13. Highlight your mask layer and apply a drop shadow. Not too harsh of one though.
14. Hide your bottom white layer then making sure you have an active layer highlighted, Layers-Merge-Visible. Resize this layer 90%. Duplicate this layer then highlight your original layer, Adjust-blur-gaussian blur-set radius-10. Highlight your top layer again and resize it by 98%. Layers-Merge Visible.
15. Now add your copyright and name to your tag and export as your favorite image file and you are finished.
I hope that you enjoyed doing my tutorial and if you have any problems please email me and I will help you where you need it
Thank You
Angel Wolf
*************************************
Here is a result from one of my testers "Zee"
Thank you so much for your help with this tut Zee and
I just luvs my new siggie too hun. Huggles To you!!
Thank you so much for your help with this tut Zee and
I just luvs my new siggie too hun. Huggles To you!!


This tutorial is for those that have a working knowledge of PSP and was created using PSP version 9 however it may be created in other versions as well. Not intended for beginners!
Tube used in this example ©Pinup Toons Which you must retain a license in order to use which may be purchased Here
(CILM is closing on December 31, 2010)
Materials Used
Scrap Kit by Gemini Creationz called "Peppermint Twist" Which is a paid kit and can be purchased from Gemini Creationz
Mask Used: By Weescotslass: WSL-167 HERE
Snow Animation By my Friend Sass Here
Font Used: Santa's Big Secret
************************************
Let Get Started.
1. Open new image 600x600 with a white background.
2. Open paper 08, Copy and paste as a new layer and apply your mask. Layers merge-merge group. Resize (all layers unchecked) 95%.
3. Open paper02, Copy and paste as a new layer. Apply the same mask again. Layers-merge-merge group. Image Mirror.
4. Open frame01, copy and paste as a new layer. Grab your selection tool set to circle and position your mouse at coordinates of 300/300 (center of canvas) and draw out a circle to cover your frame. Save your selection to the alpha channel as you will need it later.
5. Open Paper12, resize 75%. Copy and paste as a new layer. Layers-arrange-move down. Selections invert and press your delete key. Adjust, Hue and Saturation-Colorize: Hue = 155, Saturation = 255 and press ok button.
6. Open the snowdrift element, re size 50%. Copy and paste as a new layer. Position at the bottom of the frame and then grab your free hand selection tool and select the areas that are outside of the frame and press your delete key. You will need to do this for both sides if the snowdrift is extending out on both sides.
7. Open the tree and re size 50%. Copy and paste as a new layer. Adjust-sharpen. Layers-arrange-move down. Continue this step until the tree is below the snowdrift. Duplicate, image-mirror, resize 70%-adjust sharpen. Arrange this tree to your liking.
8. High light your very top layer. Open Christree02, re size 75%, adjust-sharpen. Copy and paste as a new layer and arrange on the right side of your frame to your liking.
9. Open Christree01, re size 75%, adjust-sharpen. Copy and paste as a new layer and position it next to your first tree to your liking.
10. Open bow01, re size 40%, Image-mirror-image-sharpen. Place ofer your trees to your liking.
11. Open snowflake03, re size 20%, adjust-sharpen more, copy and paste as a new layer and place it in the center of your bow.
12. P[em Bow04, re size 70%, image-rotate (rotate free), 15% to the right. Adjust-sharpen. Copy and paste as a new layer and arrange over the bottom of the frame.
13. Open the tube of your choice, re size as needed and copy and paste as a new layer and arrange to your liking.
14. Open Snowman01, resize 30%-Adjust-sharpen. Copy and paste as a new layer and arrange in the lower left of your frame, as in my tag.
15. Open flower01, re size 35%-Adjust-sharpen. Copy and paste as a new layer and arrange in the bottom center of the frame.
16. High light your very bottom layer. Image-canvas size-(centered) change your width and height to 650x650.
17. High light your very top layer. Open the mintleaf element. Image- re size 25%- Adjust-sharpen. Copy and paste as a new layer. Image-Rotate Free 45% to the right. Layers-Merge down and arrange under the flower03. Duplicate, image mirror-image-flip and arrange in the upper left of your flower. Duplicate again image mirror-arrange and duplicate once again-image flip, image-mirror and arrange. See My tag for arrangement of the leaves.
18. High light the top layer again. Open the snowflake01 element and re size 20%-image-sharpen. Copy and paste as a new layer. Place in the center of the poinsettia flower. Open snowflake02- re size 30%-image-sharpen Copy and paste as a new layer on the left center of your frame.
19. Duplicate your snowflake02, image re size 50%, image-sharpen and place in the center of your first snowflake on your poinsettia. Duplicate and place in the upper right of the frame.
20. You will now want to add your favorite drop shadow to all of your elements, tube and your frame. Add your ©, Your name and re size to your liking.
***********************************
TO ANIMATE YOUR TAG
Open the 5 layer snow animation image. and push it to the side of your screen but do not close it.
1. High light your first snowdrift layer (mine is raster 2). Selections-Load from Alpha Channel and load the selection we saved in the beginning, Selections-invert.
2. On the snow animation image high light raster 2 layer. Copy, then on your tag image paste into selection. Press your delete key and rename layer to SNOW1. (Keep Selected!)
3. On the snow animation image high light raster 3 layer, Copy. Activate your tag image and paste into selection. Press your delete key and rename layer to SNOW2. (Keep Selected).
4. On the snow animation image high light raster 4 layer, Copy. Activate your tag image and paste into selection. Press your delete key and rename layer to SNOW2. (Keep Selected).
5. On the snow animation image high light raster 5 layer, Copy. Activate your tag image and paste into selection. Press your delete key and rename layer to SNOW2. (Keep Selected).
6. On the snow animation image high light raster 6 layer, Copy. Activate your tag image and paste into selection. Press your delete key and rename layer to SNOW2. Now Deselect.
************************************
OPEN ANIMATION SHOP
1. In psp you will want to hide SNOW5, SNOW4 SNOW3 and SNOW2. Copy Merged (CTL+SHIFT+C). In animations shop paste as a new animation (CTL+V).
2. In psp you will want to hide SNOW5, SNOW4, SNOW 3 and SNOW1. Copy Merged (CTL+SHIFT+C). In animation shop, Edit-Paste-After current frame. (CTL+SHIFT+L)
3. In psp you will want to hide SNOW5, SNOW4, SNOW2 and SNOW1. Copy Merged (CTL+SHIFT+C) In animation shop, Edit-Paste-After current frame.(CTL+SHIFT+L)
4. In psp you will want to hide SNOW5, SNOW3, SNOW2 and SNOW1. Copy Merged (CTL+SHIFT+C). In animation shop, Edit-Paste-After current frame.(CTL+SHIFT+L)
5. In psp you will want to hide SNOW4, SNOW3, SNOW2 and SNOW1. Copy Merged (CTL+SHIFT+C). In animation shop, Edit-Paste-After current frame.(CTL+SHIFT+L)
*********************************
SAVE ANIMATION
1. Go to file-Optimization Wizard, A box will pop up, tick the circles that state "Animated Gif File" AND "Create a new animation from the optimized animation". Click Next.
2. After the next box pops up choose the below settings: (Customize)-
Colors Tab= Number of Colors= 255, Create Palette By: Optimized median Cut, Reduce Colors By= Error Diffusion. Choose the Optimizations tab and make sure that the very first on the list is the only one that is NOT ticked everything else needs to be selected. Click OK.Click on Next 3x.
3. File Save As (A box will pop up) Change the name of the animation to your liking and save in the location of choice.
YAY!!!!! Your All Done!!
** I hope I explained the animation ok as this is the first time I have tried to create a tutorial with animation explanation, if you have any trouble please feel free to contact me with your questions. **
Angel Wolf
*****************************************
Wednesday, December 22, 2010

This tutorial is for those that have a working knowledge of PSP and was created using PSP version 9 however it may be created in other versions as well.
Tube used in this example is from the wonderful artist ©Suzanne Woolcott which you must retain a license in order to use that can be purchased Here.
Materials Used
Scrap Kit (Be Mine) Scrappy Expressions Here
(used flower, one paper and the gem)
(used flower, one paper and the gem)
Bow From Scrappy Expressions Kiss Kit Here
Ribbon Scrapadelic (Ribbon Shop Vol. 2 Sheers) Here
(I cannot offer this as it is a paid element kit)
(I cannot offer this as it is a paid element kit)
Hearts Tube By Rainbow Coffi (PSP Playground)
Love Brush From Unknown
Doodle Brush By Myself
Mura Meister Copies
Tube of Choice
Supplies Here
I have supplied all parts needed but not the paid ribbon
***************************************
Lets Get Started
1. Open a new canvas 500x500, white and add a new raster layer.
2. Open the flower element and resize by 30%, adjust, sharpen. Copy and past this onto your new canvas as a new layer. Apply Mura Meister Copies with the below settings:

3. Highlight your bottom white layer and add a new raster layer. Choose your selection tool and choose circle as your selection type. At coordinates 250/250 make a selection to about the middle of your flower ring. Save the selection to the alpha channel for later use.
4. Open the paper you chose and resize by 50%. Effects, Image, Seamless tile-factory defaults. Now set your foreground to this pattern with an angle=0, scale=100. Flood fill the selection and Select none.
5. Keeping on this layer, open your ribbon and resize by 10% and resize again by 70%. Colorize to match your tag then copy and paste as a new layer on your tag.
6. Highlight the paper layer then open the hearts tube. Copy and paste as a new layer and move it up towards the top (don't worry if any part of it goes outside the circle because we will take care of that later). Duplicate the layer then flip and mirror it. Layers-Merge down
7. Keeping on this layer load your brush tool and locate the PmsBrush13 004. Change your foreground color to #5F1D1D and apply the brush to various areas of the circle.
8. Load your saved selection from the alpha channel then go to selections and invert, press the delete key to remove any excess from this layer.
9. Highlight the top layer and then open the bow and resize by 45%. Copy and paste as a new layer and place at the top of the flower circle.
10.Open the diamond gem tube and resize it by 80%. Adjust and sharpen. Copy and past as a new layer and place it in the center of the bow.
11. Highlight the flower ring and duplicate it. Move the duplicated layer down on top of the bottom white layer see below:

12. Adjust-Blur-Gaussian blur at 20.00 then resize by 90%. Image, Effects, Texture, Mosaic Antique with the below settings:

13. Highlight your bottom white layer again and add a new raster layer. Change your foreground color to #A05252. Open the heart swirl brush I provided and apply it near but not touching the very top yet keeping it centered on the canvas and apply it twice without moving it.
(If you prefer not to use the brush you can use the heart swirl tube that I provided, just colorize it and if it is too dark lower the opacity to your liking).
14. Highlight your ribbon layer then open your main tube. Resize the tube by 75%. Copy and past as a new layer and move it down so that it does not show at the bottom of the flower circle. Give her a drop shadow of V=5, H=5, O=50, B=10, Color=Black
Your tag is now ready to be watermarked and your name added. Save to the format you wish.
I hope that you have enjoyed doing this tutorial and if you have any problems please let me know so that I can fix it.
***************************************
Here is another from my wonderful tester Carmin
(Thanks so much for testing my tut and helping me get the kinks worked out)

Here is another version that I created


This tutorial is for those that have a working knowledge of PSP and was created using PSP version 9 however it may be created in other versions as well.
Tube used in this example is from the wonderful artist ©Suzanne Woolcott which you must retain a license in order to use that can be purchased Here.
Materials Used
Scrap Kit by Annie's Designs called "Forever" Which is a paid kit and can be obtained from Sweet N Sassy Digi Scraps Here
Mask: Floral Grunge Frame 7 By Essex Girl (Page 24) Here
Variations Plugin Filter Here (look down where it says Effects: Adjust Variations)
**************************************
Lets Get Started
1. Open Frame 2, duplicate and close the original.
2. Go to plugins, adjust-Variations and click on lighter 5x to lighten your frame.
3. Image-resize 80%, All layers unchecked.
4. Open the paper of choice. (I am using paper 8). On your material palette change your foreground to pattern and choose you paper you just opened. Angle-0, Scale-100. Click Ok.
5. Go to layers-new raster layer, Layers arrange, move to bottom and flood fill this layer with your foreground pattern.
6. Go to Layers, load/save from disk and load mask: sg_floral-grungeframe7, source luminance ticked, fit to layer ticked, invert transparency ticked, and show all mask click load. Layers-Merge group.
7. High light your frame layer which should be your top layer. Choose your deform tool and pull the nodes out (stretch) just past the outside edges of the mask to cover them. You want to be able to see the geometric effect of the mask. See image below.
8. Add a drop shadow to your frame. I used V&H: 3, Opacity: 30 and Blur: 10.
9. High light your mask layer (bottom layer). Now open the raindrops element, copy and back on your working image paste as a new layer. Image, resize 80% making sure all layers is not checked. Click ok. Move it up at t he edge (see my tag) Add the same drop shadow.
10. Making sure you are on the top layer again (the frame layer) Open the square beaded frame. Copy and paste as a new layer on your working image.
11. Again using the deform tool stretch this out so that it is around your frame and again see my tag for placement. Adjust-sharpen-sharpen and add the same drop shadow. Move to the top
12. Open flower 11, copy and paste as a new layer on your working image. Image, resize 60% and place to the right of frame and apply the same drop shadow.
13. Duplicate this flower layer and resize 50%. Image, rotate, free 15% to the right. Arrange as in my tag. Duplicate and Image, Flip.
14. Layers, merge, merge down and repeat this once more (this is merging all the flowers).
15.Open the heart 3 element. Copy and paste as a new layer on your working image. Image resize 30%. Place in on the bottom right over top of the large flower stem. Apply same drop shadow.
16. Duplicate this heart layer. Image resize 80%, Image mirror and place it next to and slightly above the first heart.
17. Open the design ribbon element. Copy and paste as a new layer on working image. Image resize 50% and place down near the bottom of the frame and move the layer down below your calla flowers layer. Again apply the same drop shadow.
18. High light the top layer again. Open bow 6. Copy and paste as a new layer on your working image. Image, mirror. Image resize 30%. Image rotate-free rotate 15% to the left. Apply the same drop shadow.
19. Open the two tone butterfly element. Copy and paste as a new layer on your working image. Resize the butterfly as needed to place in a variety of places on your tag. You can see my tag for placement. Apply the same drop shadow to each butterfly you place.
20. Once you are happy with the placement of your butterflies and have everything the way you like it, go to image, resize 80% ALL layers checked this time.
21. Open the main tube that you want placed on your tag. Copy and paste as a new layer and move it down below the ribbon layer and resize as needed. Give your tube a nice drop shadow.
22. Your tag may be too large for you so this is the time to resize it to your liking. When you do resize make sure that ALL layers is checked.
23. Add your name and copyright information and then merge all layers together. I save my tags as a png with a transparent background so I merge them visible then export as a png. Save your tag however you wish.
Animated Version for my friend and tester


This tutorial is for those that have a working knowledge of PSP and was created using PSP version 9 however it may be created in other versions as well.
Tube used in this example is from artist ©Rachel Tallamy which you must retain a license in order to use that can be purchased Here.
Materials Used
Scrap Kit by Tammy's Scraps called "S.W.A.K." Which is a paid kit and can be obtained from Here
Yvette's Tag Template #42 Here
(Scroll down and look on the right side where it says "Downloads"
(Scroll down and look on the right side where it says "Downloads"
**************************************
Let's Get Started
1. Open Yvette's tag template #42. Duplicate and close the original template. Image-canvas size and change to 600x550 keeping it centered. Add a new raster layer. Layers -arrange-move down then flood fill with white.
2. Highlight the dotted circle layer. Selections-select all-float-defloat, Selections-modify-expand by 1 pixel. Open paper #15. Copy and paste as a new layer on your tag template. Selections-invert and press your delete key. Select none. Layers-merge-merge down and apply your favorite drop shadow.
3. Highlight the circle layer. Choose your selections tool with these settings: anti aliased checked, feather=1 (this will allow for a smooth edge when flood filled). Selections-select all-float-defloat. Flood fill with color #94242C. Selections-modify-contract 5 pixels. KEEP SELECTED.
4. Open paper 17, resize 60%. Copy and paste as a new layer onto your tag template image. Selections-invert and press your delete key. Selections-select none. Layers-merge-merge down and apply your favorite drop shadow.
5. Highlight Heart1 layer- Selections-select all-float-defloat. Flood fill with white. Selections-modify-contract 5 pixels. KEEP SELECTED.
6. Open paper 15, resize 80%, copy and paste as a new layer onto your tag template image. Selections-invert press your delete key. Selections-select none, Layers-merge-merge down and apply your favorite drop shadow.
7. Open the S.W.A.K. banner1 - resize 40%-sharpen. Copy and paste as a new layer onto your tag template image. Image-rotate-free, all layers unchecked and rotate 20% to the right and place it in the center of your larger heart. (The banner will be a little short but that is ok, however if you will be using a different tube then you need to resize the banner accordingly).
8. Open the S.W.A.K. bow1 - resize 15%-sharpen. Copy and paste as a new layer onto your tag template image. Image-rotate-free, all layers unchecked and rotate 20% to the right. Place the bow in the center top of the larger heart (see my tag). Apply your favorite drop shadow.
9. Highlight Heart2 layer-Selections-select all-float-defloat. Flood fill with white. Selections-Modify-contract 5 pixels. KEEP SELECTED.
10. Open paper 11 resize 50%, Copy and paste as a new layer onto your tag/template image. Using your mover tool move it so it covers the heart. Selections-invert and press your delete key. Select none- Layers-merge-merge down. Apply your favorite drop shadow, however use negative numbers.
11. Open S.W.A.K bow 6, resize 17% and sharpen. Copy and paste as a new layer onto your tag/template image and place it in the upper center of this smaller heart then apply your favorite drop shadow.
12. Highlight your heart2 layer then open the S.W.A.K. wordart 2 (the pink kisses)- resize 21%-sharpen and copy and paste as a new layer onto your tag/template image. Image-rotate-free-all layers unchecked and rotate 19% to the left then arrange on the smaller heart as in my tag.
13. Highlight your very top layer then open the S.W.A.K. flower2. Resize 30%-sharpen, then copy and paste as a new layer onto your tag/template image. Arrange near the bottom of your tag (see mine for placement). Apply your favorite drop shadow. Duplicate the flower then Image mirror and again arrange as seen in my tag.
14. Open S.W.A.K. flower6- resize 30%-sharpen. Copy and paste as a new layer and move it down between the previous 2 flowers. Apply your favorite drop shadow.
15. Open S.W.A.K. flower7 resize 30%-sharpen. Copy and paste as a new layer onto your tag/template image. Move this down below all your layers (except your bottom white layer if you have one). and to the right of your tag so it sticks out some. Apply your favorite drop shadow, duplicate-image mirror arrange to your liking. Duplicate once more and move it to the top center of your tag so that it too sticks out.
16. Highlight your very top layer then open S.W.A.K. flower 8- resize 25%-sharpen and copy and paste as a new layer onto your tag/template layer. Move it down below all layers including the red flowers layers you just added and arrange it between the red flowers on either side. Apply your favorite drop shadow. Duplicate the flower then arrange to the opposite side of the red flowers.
17. Highlight the very top layer once again then open the S.W.A.K. Butterfly6- Image-mirror. Resize 25%-sharpen then copy and paste as a new layer onto your tag/template image and arrange over the left side of the ribbon your your large heart then apply your favorite drop shadow. (See my tag for placement).
18. Highlight your heart1 layer then open the tube which you will be using for your tag. Resize accordingly and then copy and paste as a new layer onto your tag. Arrange to your liking then apply your favorite drop shadow. (If using a different tube you may want it to be above the heart layer so just arrange your tube layer where you want it).
19. Hide your very bottom white background layer then highlight any one of your other layers. Layers-Merge-Merge Visible. Duplicate this layer.
20. Highlight your original tag layer-Adjust-blur-gaussian blur with a radius of 15-Apply. Effects-Texture Effects-Blinds With the following settings: Width= 3, Opacity= 100, Color= white, Horizontal= unchecked, Light from top/left= unchecked and apply.
21. Highlight your very top layer and apply your copyright and your name then merge and export as your favorite image format.
I hope that you enjoyed doing my tutorial and if you have any problems please email me and I will help you where you need it
Thank You
Angel Wolf
***************************************
Here is a result from one of my testers "Zee"
Thank you so much for testing this tut.
I absolutely love your result girl!
Thank you so much for testing this tut.
I absolutely love your result girl!


This tutorial is for those that have a working knowledge of PSP and was created using PSP version 9 however it may be created in other versions as well.
Tube used in this example is from the wonderful artist ©Dominic Marco which you must retain a license in order to use that can be purchased Here.
Materials Used
Scrap Kit by Irene Alexeeva called "Kind of Magic" Which is a paid kit and can be purchased from Scrap Orchard. I also used grass and daisy elements from Flergs Buttercup 2 Mini Kit which can be purchased from her store Here
Bow of your choosing
No outside filters used
*****************************
1. Open new image 700x700, transparent-Layers new raster layer and flood fill white.
2. Open ial_kom_paper5, resize 20%. Copy and paste as a new layer onto your working tag. Layers, Load/Save Mask-Load Mask WH-mask11 and apply. Layers merge group.
3. Keep on this layer and repeat the above step except choose WH-mask8. Layers-merge group, Layers merge down.
4. Open ial_kom_sfbook, resize 35%-sharpen. copy and paste as a new layer onto your working tag. Apply your favorite drop shadow.
5. Hi light raster layer 2 (your mask layer), Open ial_kom_sfmoon-resize 35%. Copy and paste as a new layer onto your working tag and arrange in the upper right of the book (see my tag). Apply your favorite drops shadow.
6. Hi light raster layer 2 (your mask layer),open ial_kom_sfmagicaldust-resize 25%-sharpen. Copy and paste as a new layer onto your working tag and arrange above the book and around the moon (see my tag for placement). Apply a very subtle drop shadow.
7. Hi light the top layer and open ial_kom_sfstar1-resize 35% (all layers unchecked-do not sharpen), copy and paste as a new layer onto your working tag and place it in the upper left over the magic dust (see my tag for placement). Apply your favorite drop shadow. Open ial_kom_sfstar2-resize 35%-copy and paste as a new layer onto your working tag and place in the center of the magic dust. Apply your favorite drop shadow. Open ial_kom_sfstar3-images-mirror-resize 25%, copy and paste as a new layer onto your working tag and arrange on the top right above the moon and over the magic dust. Apply your favorite drop shadow. Layers merge down twice (this merges all the star layers together).
8. Open your favorite bow-colorize to match your tag and place in the center of the book. Apply your favorite drop shadow.
9. Hi light your top layer, open ial_kom_house1-resize 16%-sharpen, copy and paste as a new layer onto your working tag and place on the right book page. Apply your favorite drops shadow.
10. Hi light raster layer 7- open ial_kom_sfweathervane- resize 5%-image mirror- copy and paste as a new layer onto your working tag and move it over to the right side of the house (see my tag for placement). Apply your favorite drop shadow.
11. Hi light your top layer and open ial_kom_sfheart3-resize 17% (do not sharpen), copy and paste as a new layer onto your working tag and arrange on the left side of the house (see my tag for placement)- lower the opacity to 35%. **Don NOT add a drop shadow.
12. Open ial_kom_sfheart1- resize 10% (do not sharpen). copy and paste as a new layer onto your working tag and place on the right side of the house (see my tag for placement) lower the opacity to 35%. **Do NOT add a drop shadow.
13. Open Flergs_Buttercup2_Grass resize 5% and resize again 80%, sharpen, copy and paste as a new layer onto your working tag and place to the lower left of the house, duplicate-mirror and move to the right side of the house, duplicate again and move it to the left of this patch of grass, duplicate one last time- mirror and move into the final empty space. Layers-merge down- 3 times. (This merges all grass layers). Apply favorite drop shadow.
14. Open Flergs_Buttercup_2_Daisy Stems-resize 5% and again at 60%-Sharpen, copy and paste as a new layer onto your working tag and place to your liking. Apply your favorite drops shadow. Duplicate and place in another location to your liking. Once you have all your daisy stems placed. merge them down until they are only one layer then apply your favorite drop shadow.
15. Making sure your top layer is hi lighted, open ial_kom_sf_bluecar (or pink car)- resize 15%- sharpen. Copy and paste as a new layer onto your working tag and arrange to the lower right corner of the book. Apply your favorite drop shadow.
16. Open ial_kom_sf_bench- resize 8%, copy and paste as a new layer onto the left side of your book (see my tag for placement). Apply your favorite drop shadow.
17. Open ial_kom_sf_tree-resize 13%. copy and paste as a new layer onto your working tag and place in the lower left corner of your book. Apply your favorite drop shadow.
18. Open ial_kom_sf_cloud- resize 10%, sharpen- copy and paste as a new layer onto your working tag. Image-rotate- rotate free- right at 15%. Arrange as in my tag. Apply your favorite drop shadow.
19. Hi light your book layer (raster 3). Open ial_kom_sf_lantern, resize 10% then again 90%. and arrange on the right side of the bench. Apply your favorite drop shadow.
20. Hi light your top layer. Open Flergs_Buttercup2_Grass once more- resize 5% and again at 80%-sharpen. Copy and paste as a new layer over the tree trunk. Duplicate this grass layer and rotate so that the grass layers will follow the contour of the books page, or to your liking. Merge all your grass layers down to only one layer then apply your favorite drop shadow.
21. Open Flergs_Buttercup2_DaisyStems again and resize 5% then again 70%-sharpen and copy and paste as a new layer onto your working tag and again place in various locations of the grass. Once happy with all your daisy stem layers- merge them down to only one layer. Apply your favorite drop shadow.
22. Hi light your top layer, open iak_kom_sf_cat- mirror- resize 7%. Copy and paste as a new layer onto your working tag and place in front of the bench near the center of the book. Apply your favorite drop shadow.
23. Open the tube of choice and resize as needed, place in front of the bench and apply your favorite drop shadow.
24. Open ial_kom_sf_wa03black (word art), resize 15%, copy and paste as a new layer onto your working tag. Arrange below the book scene (See my tag for placement). Apply your favorite drop shadow.
25. Apply your tube credits and your name on a new layer apply drop shadow of your choice and export as your favorite image format.

This tutorial is for those that have a working knowledge of PSP and was created using PSP version 9 however it may be created in other versions as well.
Tube used in this example is from artist ©Elias Chatzoudis which you must retain a license in order to use that can be purchased HERE.
Materials Used
Scrap Kit by JosDZigns called "Cupid's Target" Which is a paid kit and can be obtained from HERE
**Note**
Animation is NOT written into the tutorial. I added it at the last minute
Animation is NOT written into the tutorial. I added it at the last minute
******************************
Let's Get Started
1. Open template_11_TMW. Duplicate the template and close the original. Delete the copyright layer then highlight the very top layer (strip down). Layers-merge-merge down. Merge layers down once more.
2. Highlight the "thin circle" layer. Selections-select all, float, defloat. Selections-Modify-expand 2 pixels. Open "PINK W DOTS PAPER", resize 60%. Copy and paste as a new layer onto your tag/template image. Selections-invert, press your delete key. Deselect and apply your favorite drop shadow with both positive and negative numbers.
3. Highlight the "grey circle" layer. elections-select all, float, defloat. Selections-Modify-expand 1 pixels. Open "RED FLORAL PAPER", resize 50%. Copy and paste as a new layer onto your tag/template image. Selections-invert and press your delete key. Deselect.
4. Highlight the "thin circle" layer again and then go to Layers-merge-merge down.
5. Highlight the very top layer (should be called strip middle). Selections-select all-float-defloat. Selections Modify-expand 2 pixels, then flood fill with white. Selections-modify-contract 2 pixels. KEEP SELECTED.
6. Open "SOLID PLAID PAPER", resize 50% copy and paste as a new layer onto your tag/template image. You will need to move it to cover the thin strips. Selections-invert and press your delete key. Deselect and apply your favorite drop shadow.
7. Highlight the "right heart" layer. Selections-select all-float-defloat. Selections-modify-expand 2 pixels. Flood fill with color #8D1E1E. Selections-modify-contract 3 pixels. Open "PINK W DOTS PAPER", resize 50% copy and paste as a new layer onto your tag/template image. You will need to move the paper to cover the heart. Selections-invert press your deleted key. Deselect Layers-Merge-Merge down then. Apply your favorite drop shadow.
8. Highlight the "left heart" layer. Selections-select all-float-defloat. Selections-modify-expand 2 pixels. Flood fill with Color #E7AFB2. Selections-modify-contract 3 pixels. Open "RED W HEARTS PAPER", resize 50%. Copy and paste as a new layer onto your tag/template image. Move it to cover it then Selections-invert press deleted key. Deselect. Layers-merge-merge down then apply your favorite drop shadow.
9. Highlight the "heart circle" layer. Resize this layer by 105%. Selections-select all-float-defloat. Open "RED FLORAL PAPER" copy and paste as new layer onto your tag/template image. Selections-invert and press your delete key. Deselect. Duplicate the layer then highlight the duplicated layer and Layers-merge-merge down. Apply your favorite drop shadow Delete the "original" heart circle layer.
10. Highlight "Love is in the air" layer resize 105%. Selections-select all-float-defloat. Add a new raster layer and flood fill with color #700000. Deselect and apply your favorite drop shadow.
11. Highlight your very top layer then open ""CHECK BOW" resize 35%, sharpen. Copy and paste as a new layer onto your tag/template image and place in the top center of your right heart. Apply your favorite drop shadow.
12. Open "RED CUPID" Resize 90%- sharpen. Copy and paste as a new layer onto your tag/template image and move to the center of your right heart. Apply your favorite drop shadow.
13. Open "STRING OF BEADS" resize 50%-sharpen. Copy and paste as a new layer onto your tag/template image and place on the center of the 3 thin strips. Apply your favorite drop shadow.
14. Open "PINK FLOWER" resize 45%-sharpen. Copy and paste as a new layer onto your tag/template image and move it over to the top left of the 3 thin strips. Apply your favorite drop shadow. Duplicate the flower and move it over to the lower right of the 3 thin strips.
15. Open "RED FLOWER" resize 30%-sharpen. Copy and paste as a new layer onto your tag/template image and place it to the lower left of the pink flower. Apply your favorite drop shadow. Duplicate the flower and move it to the upper right of the pink flower. Layers-arrange-move up (so that it lays on top of the pink flower).
16. Open tube of choice. Resize as needed. Copy and paste as a new layer onto your tag/template image and move this layer down below the 3 thin strips layer. Apply your favorite drop shadow.
17. Using your rectangle selection tool select the area around your tube that is showing below the top thin strip. Once selected. Invert and press delete then apply your favorite drop shadow.
18. Hide your bottom white layer then highlight any of your other layers. Layers-Merge-Merge visible. Resize 80%-sharpen.
19. Duplicate this layer then highlight the original (below top layer). Adjust-blur-gaussian blur-radius=10 Accept. Plugins-DSB Flux- Linear Transmission= Slice Size= 2, Offset= 2, Blend= 50, Horizontal checked. Apply.
20. Apply your copyright information and your name, crop as desired, then export as your favorite image format.
I hope that you enjoyed doing my tutorial and if you have any problems please email me and I will help you where you need it
Thank You
Angel Wolf
****************************
WOW!! This is a fantastic result from Zee!!
Thanks so much for testing for me. I
absolutely love your result.
Thanks so much for testing for me. I
absolutely love your result.
Hugs Angel Wolf

 Tube used in this example ©Rachael Tallamy Which you must retain a license in order to use which may be purchased Here Materials Used Scrap Kit by Baby Cakes called "Whimsy" Which can be Obtained from Here Other Materials and Filters Used: ********************************** Lets Begin Open WSL Mask260 and minimize for now. 1. Open a new image 600x650 2. Open BCS_Aged_Frame, resize 75%, sharpen. Plugins-Adjust-Variations and click on more cyan once and apply. 3. Using your magic wand, click in the center of the frame to select it. Selections-modify-expand by 5. 4. Open BCS_Paper_Fourteen or one of your choice. Resize 70%. Copy and paste as a new layer onto your tag image. Selections- invert and press your delete key. Layers-arrange-move down. 5. High light the frame layer. Open BCS_Ivy, resize 40%. Copy and paste as a new layer onto your tag image. Rotate-free 45% to the right. Place it on the right top corner of the frame as in my tag. Apply your favorite drop shadow. Duplicate this layer. Image-mirror, layers-merge down. 6. High light the very top (ivy layer) Open BCS_Bead_Swirl_Two. Resize 70%-sharpen. Copy and paste as a new layer onto your tag image. Move down below your frame layer in the upper right of your frame. See my tag for reference. Apply your favorite drop shadow. Duplicate-image-mirror-flip. Layers-merge down. 7. High light the top layer again. Open BCS_Rose_Cluster. Resize 30%-sharpen. Copy and paste as a new layer onto your tag and place on the lower right side of your frame. Apply your favorite drop shadow. Duplicate-image-mirror. Layers-merge down. 8. High light the top layer. Open BCS_Curly_Ribbon_Two. Resize 25%-sharpen. Arrange over the rose clusters near the bottom. Apply your favorite drop shadow. Duplicate-image-mirror. Layers-merge down. 9. High light the top layer and open BCS_Daisy. Resize 20%-sharpen. Copy and paste as a new layer onto your tag image and place in the center of the rose clusters. Apply your favorite drop shadow. Duplicate the daisy and resize 90% and place to the lower right of the center daisy-duplicate image mirror. Layers-merge down twice. 10. High light the Ivy layer and open the BCS_Daisy again. Resize 20%. Copy and paste as a new layer onto your tag image and place near the bottom of one of the ivy vines. Apply your favorite drop shadow. Duplicate-image-mirror. Layers-merge down. 11. High light the top layer and open BCS_Tied_String_Two. Resize 40%-sharpen. Copy and paste as a new layer onto your tag image and place over the ivy and daisy on the right side of the frame. See my tag for reference. Apply your favorite drop shadow. 12. High light the top layer an open BCS_Brad (the green one). Resize 20%-sharpen. Copy and paste as a new layer onto your tag image and place in one of the corners of the frame. Apply your favorite drop shadow. Duplicate-image-mirror. Layers-merge down. 13. High light the top layer and open BCS_Blossom. Resize 30%-sharpen. Copy and paste as a new layer onto your tag image and place in the top center of the ivy on your tag but slightly placing it to the left. Apply your favorite drop shadow. Duplicate, layers merge down. 14. High light the top layer and open BCS_Butterfly_Nine (or one of choice). Resize 20%. Copy and paste as a new layer onto your tag image and place between the 2 blossoms in the top center. Apply your favorite drop shadow. 15. High light your paper background layer below the frame. Open the tube of choice and resize as needed. Copy and paste as a new layer onto your tag image and arrange to your liking. Apply your favorite drop shadow. 16. High light the very bottom layer. Open BCS_Paper_Fifteen or one of choice and resize 80%. Copy and paste as a new layer onto your tag image. Layers-new mask layer-from image. Choose the WSL Mask260, Source Luminance checked and Invert Mask Data Unchecked. Apply. Layers-merge group. 17. Merge all layers visible. Apply your copyright and your name then export as your favorite image format. *************************** This is the original Tag I created Before deciding to write this tutorial 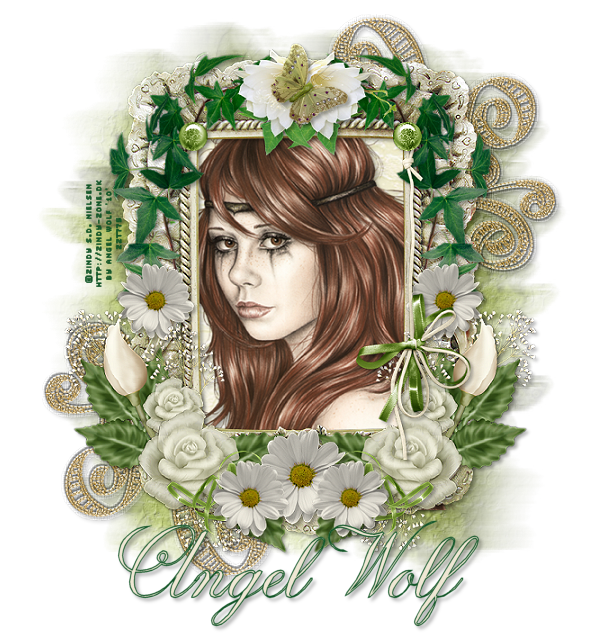 |
Subscribe to:
Posts
(Atom)
I Create For:

Blogroll
-
Easter Elegance- CT for Starlite and Soul - •♦• •♦• •♦• •♦• •♦• •♦• •♦• • ****CT for Starlite and Soul**** Kit Name: Easter Elegance Artist: AI Generated tube by Starlite and Soul Where to st...
 5 weeks ago
 -
NEW MOTHERS DAY COLLAB - CHILDHOOD BLESSINGS - WE HAVE COME TOGETHER AGAIN TO BRING YOU THIS LOVELY MOTHERS DAY THEMED COLLAB- YOU WILL $AVE BUY PURCHASING THE COMPLETE COLLAB - HERE OR YOU CAN PUR...
 3 years ago
 -
6th Annual Halloween Candies Freebie BlogTrain 2018 - You can get all the beautiful parts of this train here: https://madmimi.com/p/efd22d You can get my part here! https://www.dropbox.com/s/ndrao7pwthm...
 5 years ago
 -
-
New Freebie Kit - For The Love Of Autumn - *Hi All New kit For you!! For The Love Of Autumn.. I hope you like it tons of gorgeous elements vibrant Autumn colors, cute fall critters and all things f...7 years ago
-
CU BEAR IN THE CUP SCRIPT AND TEMPLATE - *AVAILABLE IN THE STORES* [image: post signature]
 8 years ago
